XUNI GUI Wallet
- Home
- UltraNote GUI Wallet
UltraNote GUI wallet basics
Main Window:
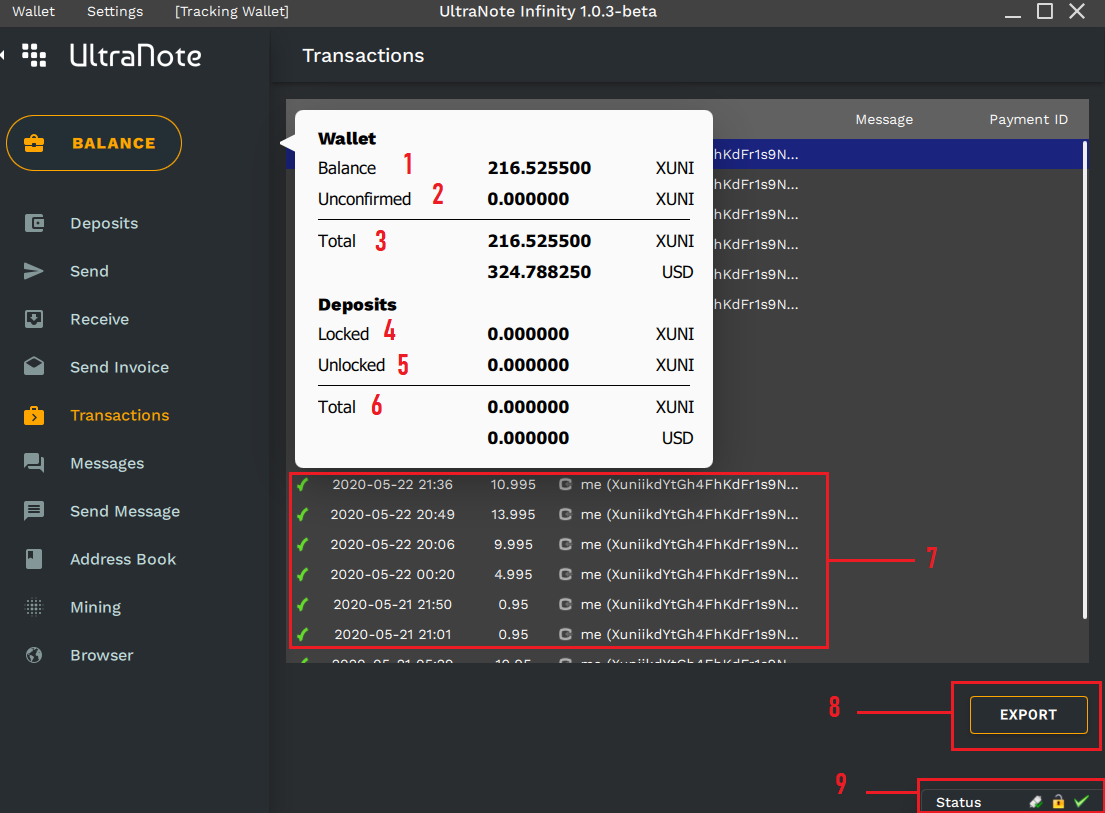
1. Balance: Gives you info about how many XUNI coins you have in your UltraNote wallet.
2. Unconfirmed: Gives you info about incoming XUNI coins to your UltraNote wallet.
3. Total: Gives you info about the total amount of XUNI coins you have in your UltraNote wallet Confirmed/Unconfirmed.
4. Locked: Gives you info about how many XUNI coins you have locked in deposit.
5. Unlocked: Gives you info about how many XUNI coins are unlocked and you can withdraw.
6. Total: Gives you info about total amount of XUNI coins you have Locked/Unlocked.
7. Recent transactions: Here you can see a list of last transactions to your UltraNote wallet.
8. Export: Allows you to export wallet transactions to .csv file.
9. Status: Gives you info about your UltraNote wallet, Ex: if wallet is connected to peers, Encrypted with password and if it's fully synced.
Deposit your XUNI coins
Deposits Window:
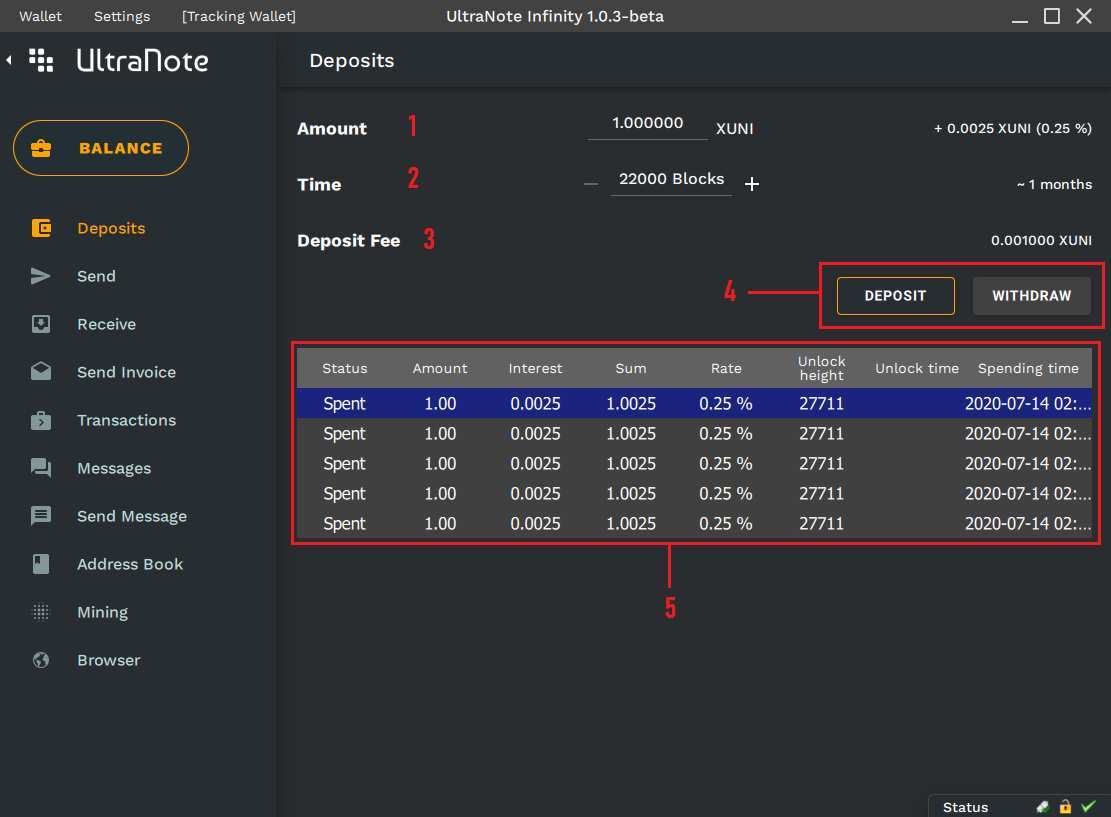
1. Amount: You need to set the amount of XUNI coins you want to deposit. Based on lock time you will receive your deposit interests from 0.25-3%
2. Time: Deposit time is calculated based on blocks. Min. 22000 Blocks = to 1 month. Max. 264000 Blocks = 1 year.
3. Fee: Deposit fee.
4. Deposit/Withdraw: Click Deposit to confirm your deposit or Withdraw to withdraw unlocked coins.
5. Deposit list: Gives you a list of your deposits and their status.
Sending XUNI Coins
Send Window:
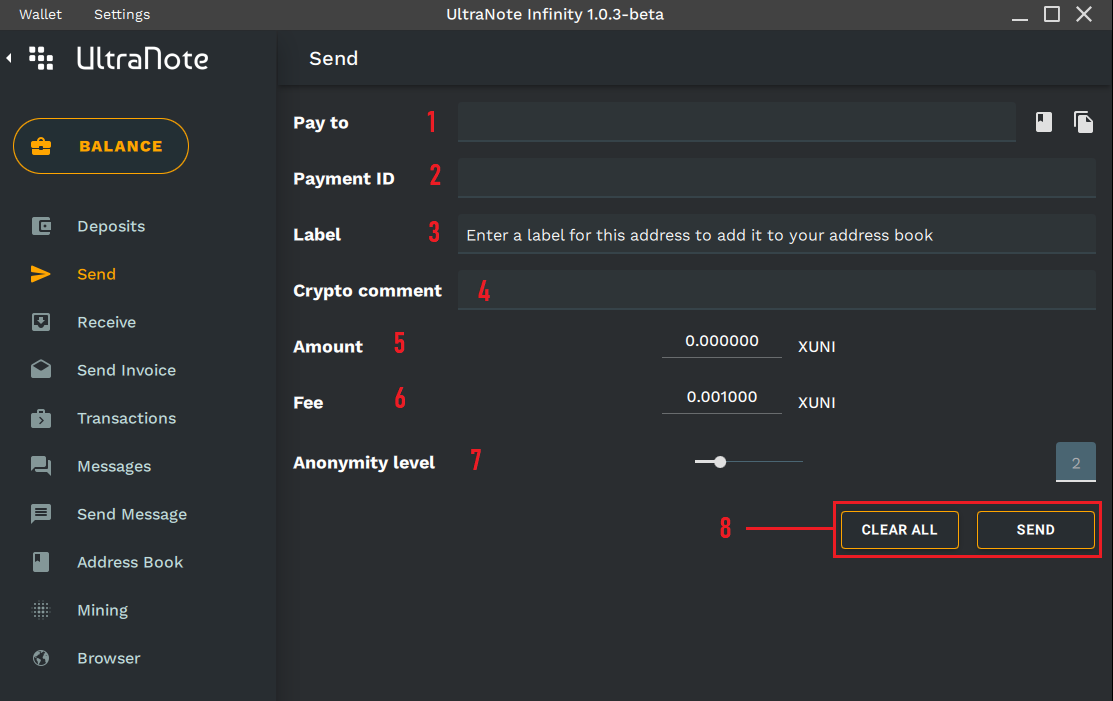
1. Pay To: UltraNote wallet address where you want to send your XUNI coins.
2. PaymentID: Used to send coins to a wallet address where a group of people share same wallet address. PaymentID will define which user receive the payment. Mostly
used to send coins to exchanges.
3. Lable: Give the wallet address a lable to be saved to your address book.
4. Crypto Comment: Add an encrypted message to your transaction.
5. Amount: You need to set the amount of XUNI coins you want to send.You must have funds that covers your transaction.
6. Fee: Transaction fee is dynamic based on comments. You need to modify the fee if you are sending a big transaction or if you want that your transaction will go
faster on the network. Minimum fee 0.001 XUNI.
7. Anonimity Level: You can define how anonym you want your transaction to be from 1-10. Higher anonimity level require higher fees.
8. Confirmation: Click Send to confirm your transaction or Clear All to delete all the info you have added.
Receive XUNI coins
Receive Window:

Here you can find your public wallet address in form of a QR code or you can copy it using copy icon, you can share it with people to receive XUNI coins.
Send Invoice
Send Invoice Window:
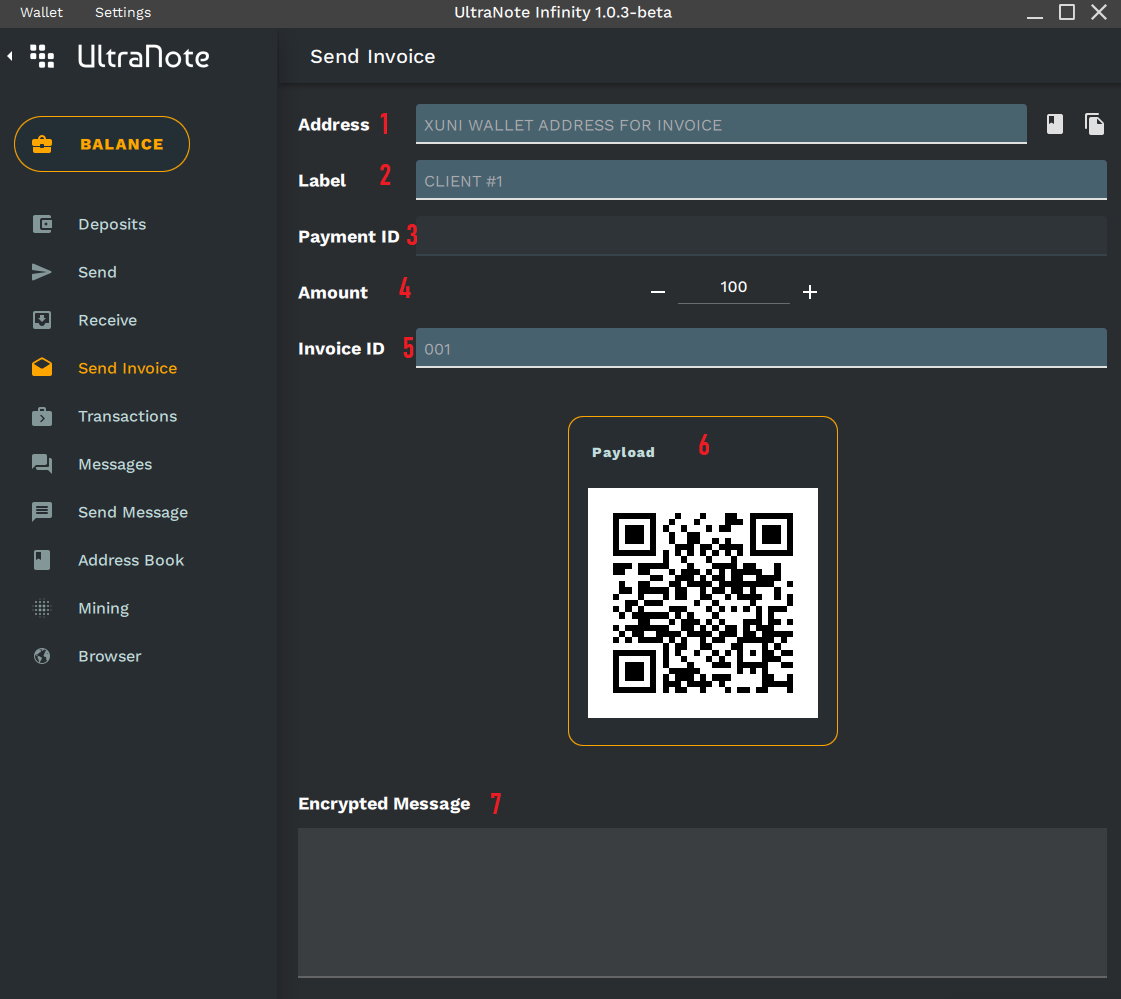
1. Address: UltraNote wallet address where you want to send your XUNI invoice.
2. Lable: Give the wallet address a lable to be saved to your address book.
3. PaymentID: Used to send coins to a wallet address where a group of people share same wallet address. PaymentID will define which user receive the payment. Mostly used to send coins to exchanges.
4. Amount: You need to set the amount of XUNI coins you want to charge.
5. Invoice ID: Give you invoice an ID.
6. Payload: Your invoice generated QR code.
7. Encrypted message: Add an encrypted message to your invoice.
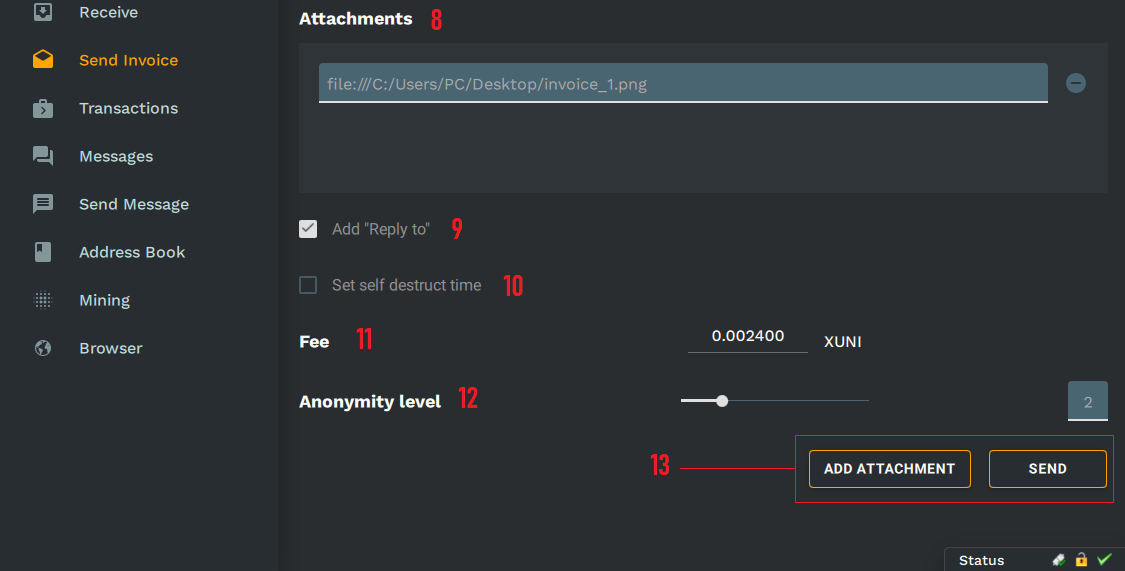
8. Attached files: List of attached files in your message.
9. Add reply to: Option is enabled by default to show your wallet address.
10. Self destruct time: Allows you to auto destory your message after that many minutes.
11. Fee: Transaction fee is dynamic based on text and file size.
12. Anonymity level: Set the anonymity level you wish to send your message with.
13. Add attachement: Click Add attachement to add your invoice in PDF or any other format.
See/Export your wallet transactions
Transactions Window:
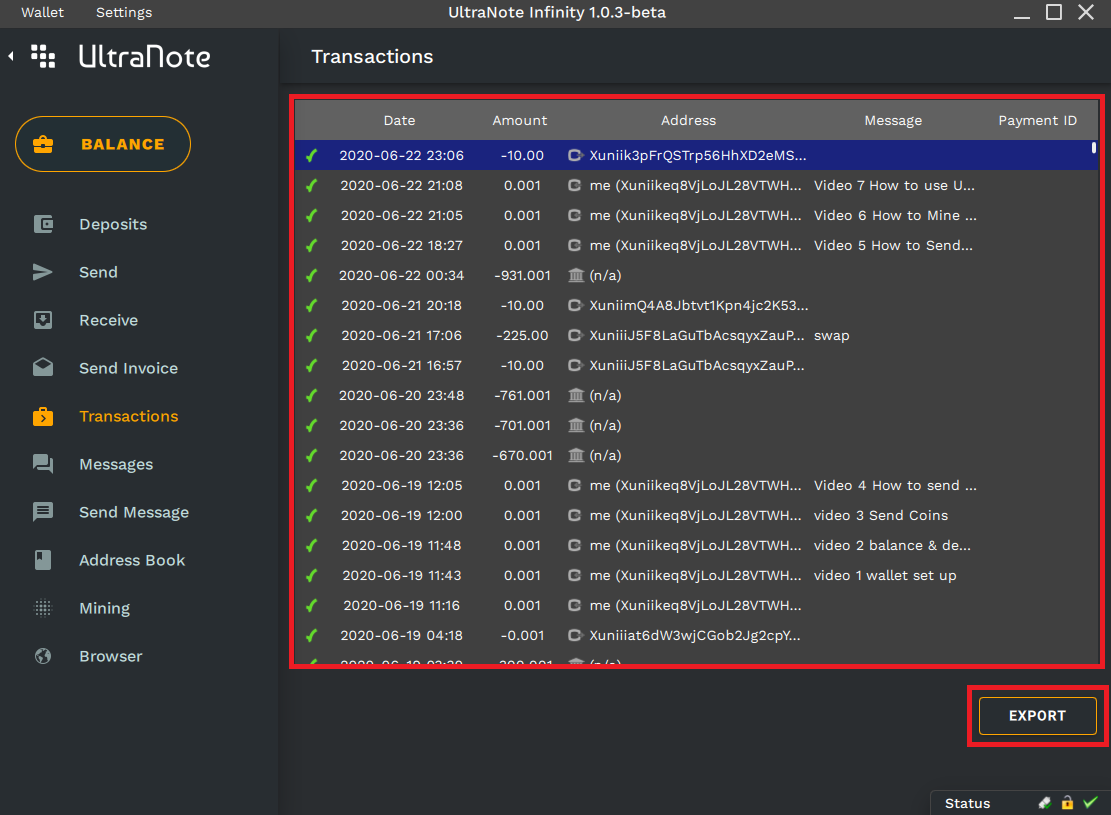
Here you can see all your wallet transactions and you will be able to export it as a CSV file.
Read your messages
Messages Window:
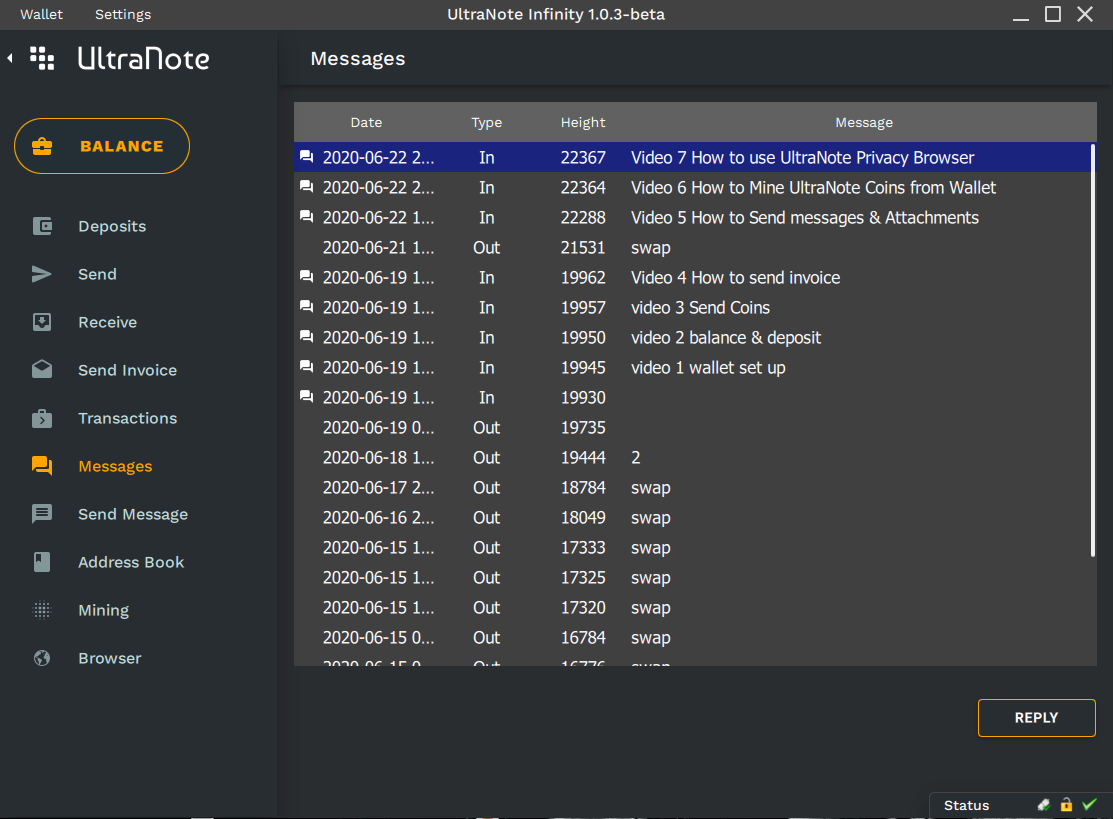
Here you can see a list of the messages you have received from another UltraNote users. Double click any message to read.
Send messages and files up to 100Mb
Send Message Window:
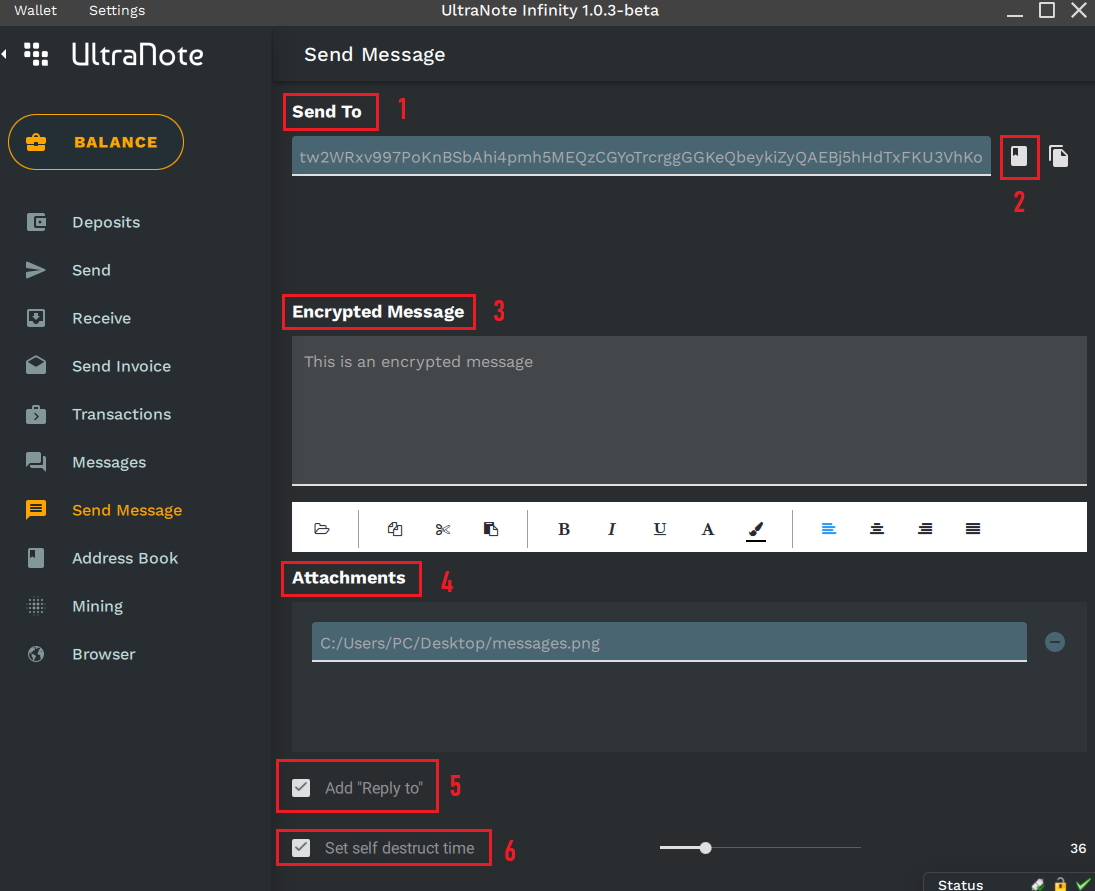
1. Send To: UltraNote wallet address where you want to send your message.
2. Address Book: You can copy your saved contacts directly from your address book.
3. Encrpted message: Same as encrypted comments, All your communications using UltraNote wallet is encrypted and we keep updating our encryption for better security.
4. Attachments: Your attached files.
5. Add Reply To: You can check the box if you want to recipient to see your wallet address and reply directly from same message.
6. Set self destruct time: UltraNote wallet allow you for better security to set a self destruct timer to your message, Where the message will be removed and deleted from the blockchain.
7. Fees: Fees are dynamic based on message option and file attachment size.
8. Anonimity Level: Set anonimity levels 1-10 where 1 is low anonimity and 10 is very high anonimity.
9. Confirmations: Done writing your message? Maybe time to send it or why not add a file as an attachment. Here where you can add it.
Managing contacts and address book
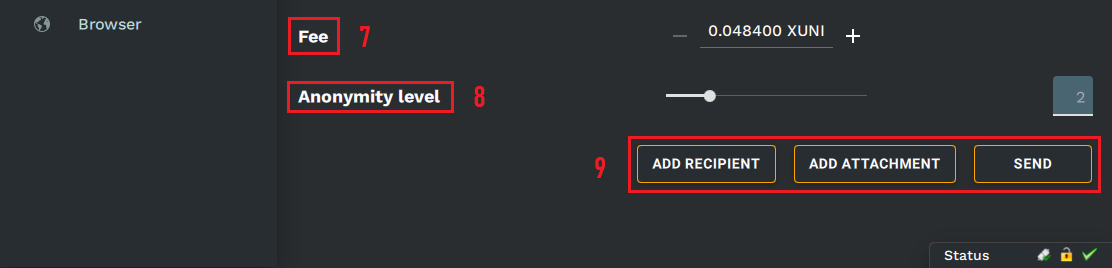
Address Book Window:
To add new contacts to your wallet address book, Click on New address then a small window will open where you can give a lable and wallet address. The contact will
be added to your address book.
To remove a contact, select the contact you want to remove and click on minus sign.
You need to backup your address book and save a copy so you can import it to a new wallet.
Mining using UltraNote wallet
Mining Window:

1. Select one of the pools from the drop down menu that works best for you. Testing should be fine.
2. Add pool: You can add your own pool to the wallet by clicking Add pool.
3. Default pools: Click default pools if you want to reset the pools list and delete any additional pools.
4. CPU Cores: You need to set the number of CPU cores you want to spare for mining. Don't use all cores. Less cores may give same hashrate.
5. Start Mining: When you are ready to start mining click start mining and you will start to see your hashrate and balance growing over time in your wallet.
You can also enable mining schedule to enable automatic mining where you can set when the miner starts and stops mining.
Using wallet browser
Browser Window
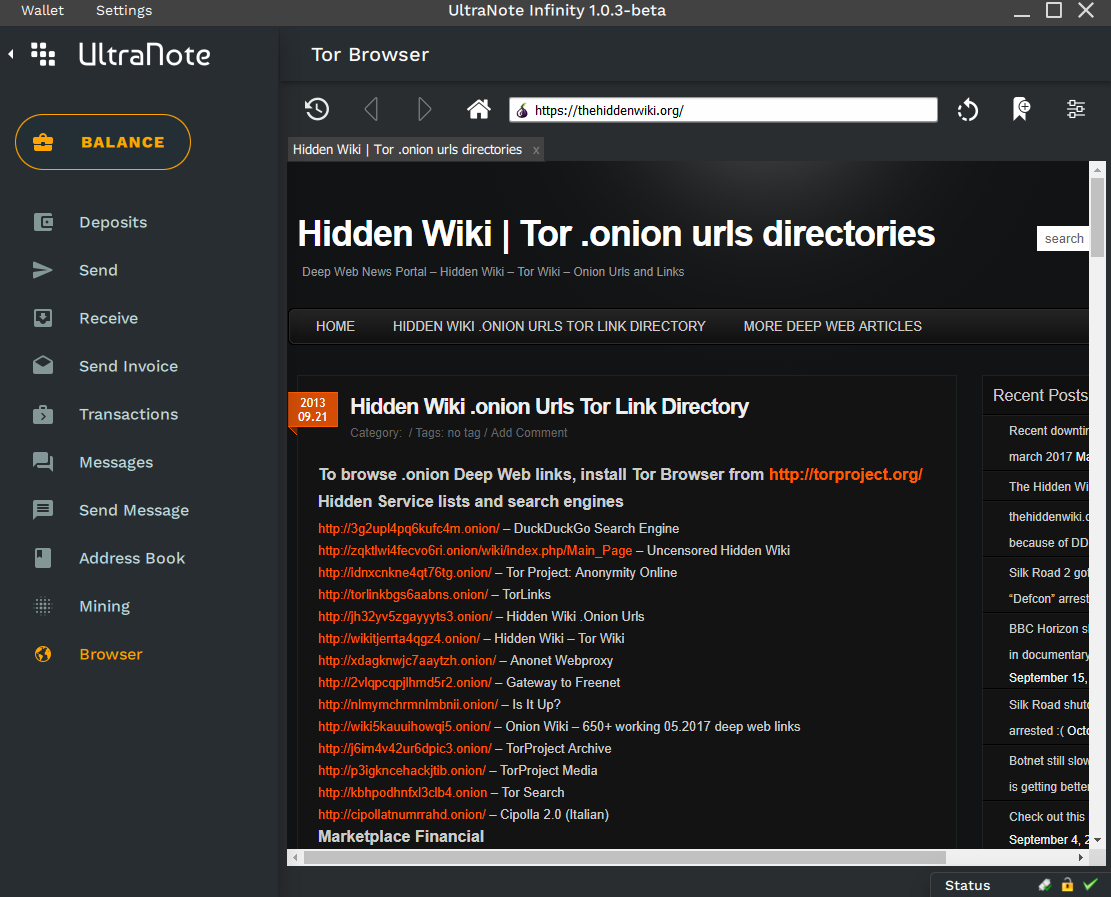
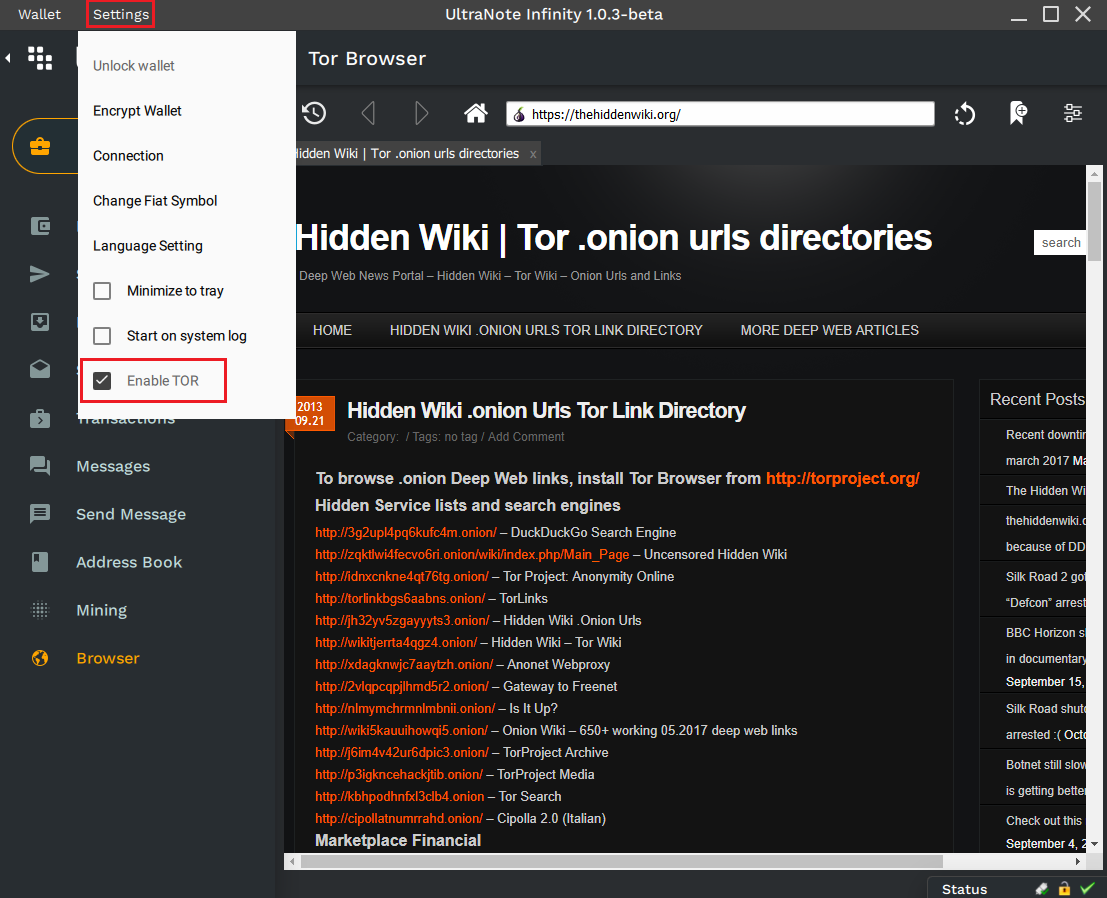
Using TOR
To enable TOR go to Settings > Enable TOR. With TOR enabled you can now browse Darknet safely.
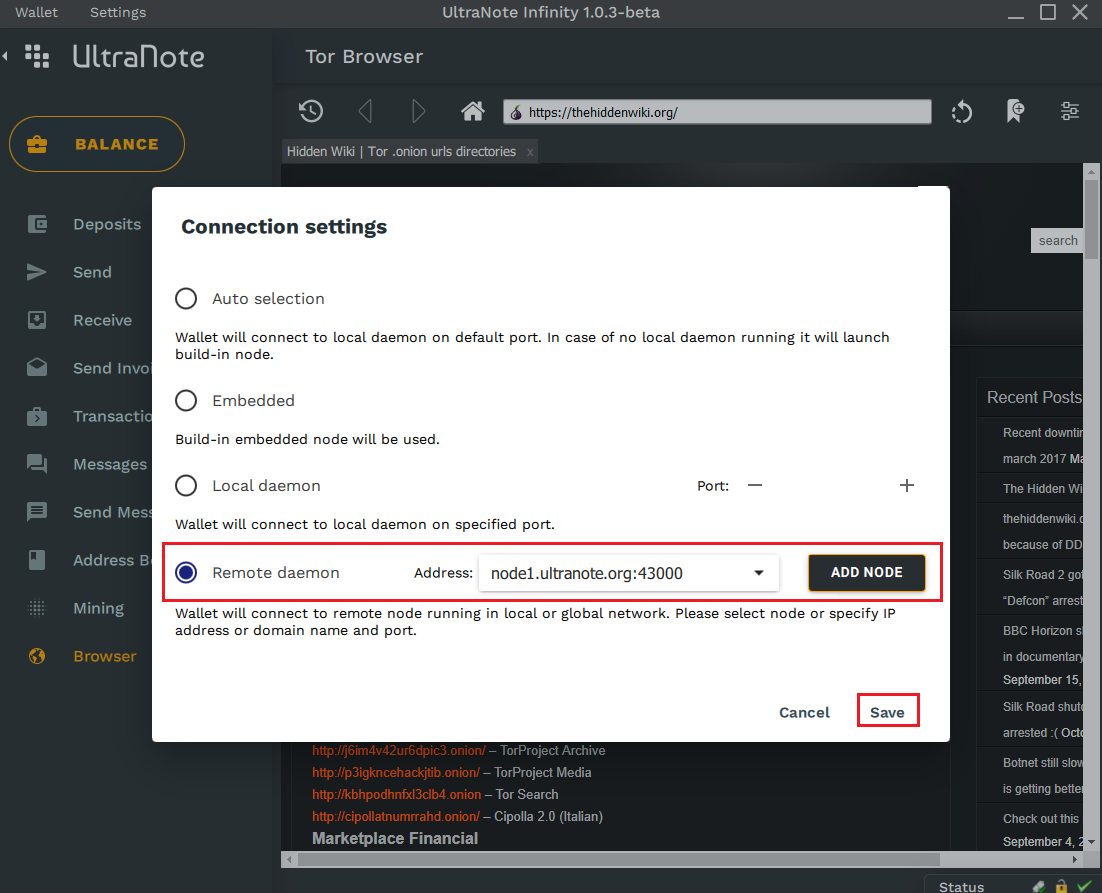
Connecting to an UltraNote remote node
Click on Settings > Connection
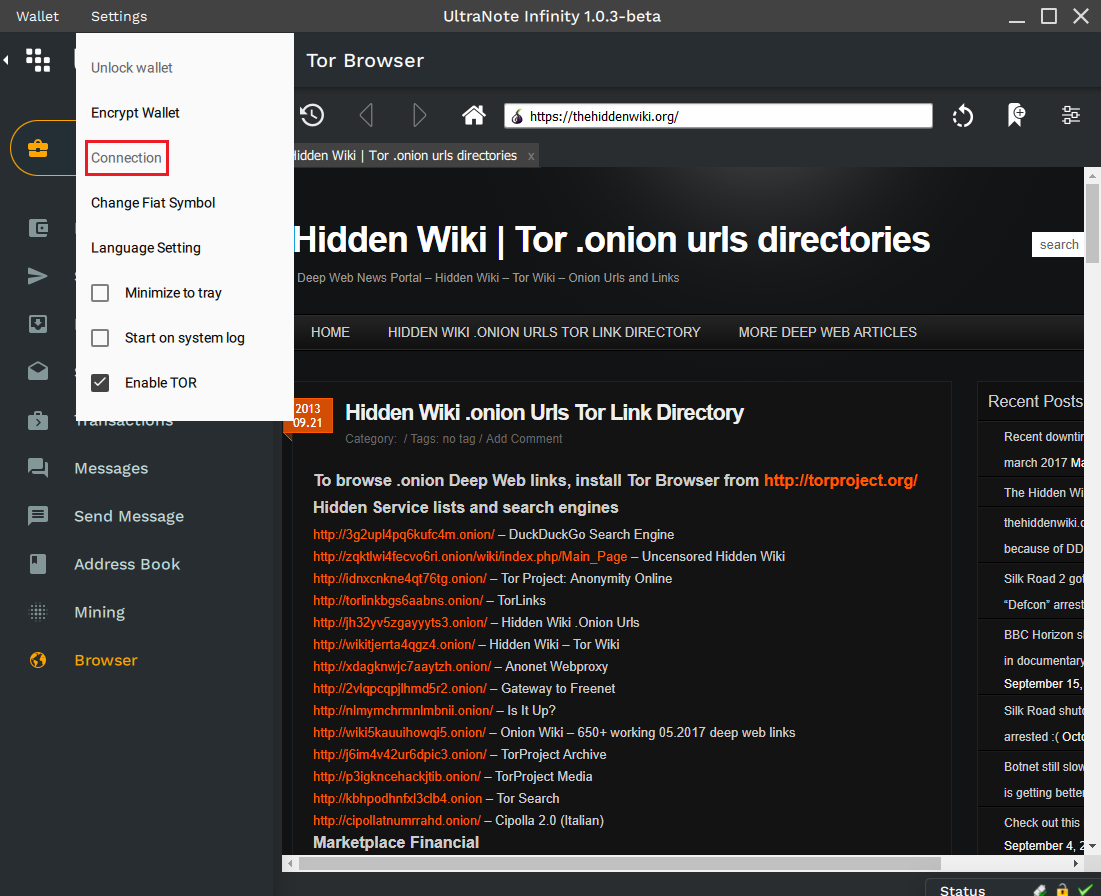
Select Remote Daemon, Or add a new one then save your option.